Monday, March 31, 2014

Stampin' Up! Flower Shop & Petite Petals cards


 Are you ready for spring? I am, so I decided to make my own flowers using Petite Petals and Flower Shop. I CASED this card. I have seen this card on pintrest and thought I should try my hand at it. What do you think?

Instructions on how to make this flower combination of Flower shop and Petite Petals

  1. Cut a card base of  8 1/2"x5 1/2", your color choice.
  2. Cut a 5 1/2"x 2 in Whisper white
  3. Cut a 5 1/2"x 2 in DSP (Designer Series Paper)
  4. Stamp your image on the Whisper White card stock before mounting it on the card
  5. Adhere the DSP to the front of the card. Line up the Whisper White with the DSP.
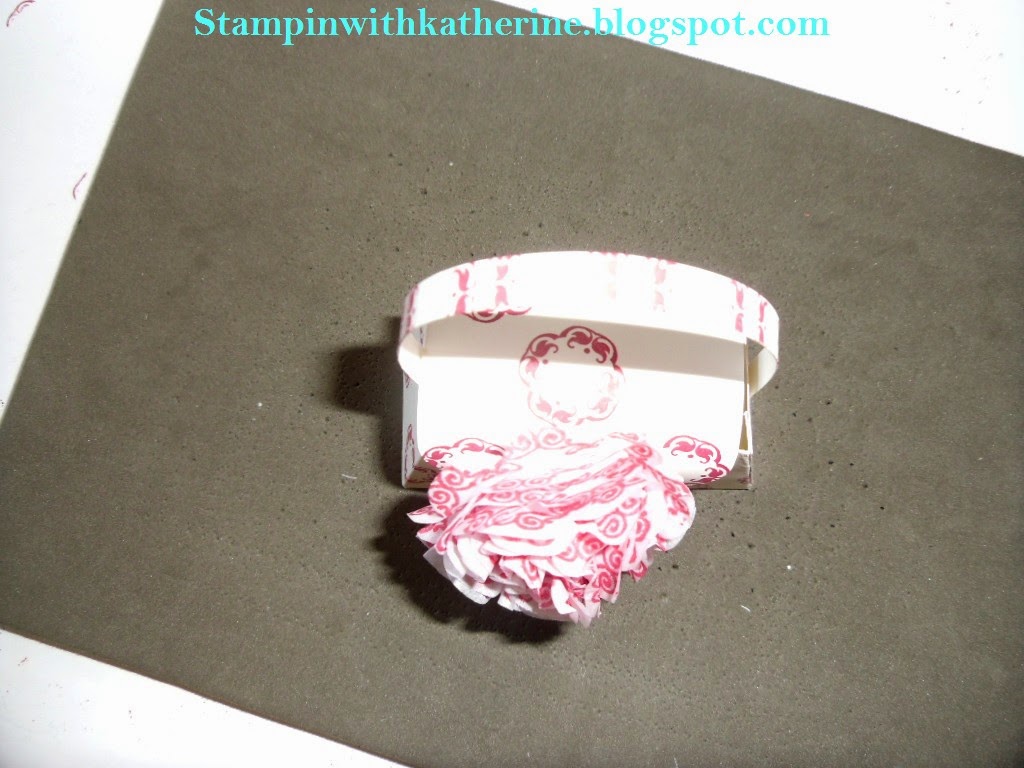
  6. Take a few scraps of Whisper White card stock and stamp four Flower shop flowers in the color of your choice.
  7. You will do the same for Petite Petals.
  8. Using the Petite Petals and Pansy punch, punch out all eight flowers.
  9. I used dimensionals to adhere the Petite Petals to the Pansy Punch.
  10. Adhere the flower to the card using your favorite adhesive. The flowers will cover up the seam of the two card stocks.

Products to make your Flower shop & Petite Petals cards

Flower shop Clear stamp set - Item # 130942
Pansy Punch - Item # 130698
Petite Petals Clear stamp set - Item # 133155
Petite Petals Punch- Item # 133322
Stampin' Dimensionals - Item # 104430
Whisper White Card stock 8 1/2"x11-Item # 100730
Summer Starfruit ink pad - Item #126991
Rich Razzleberry ink pad - Item #126950
Melon Mambo ink pad - Item #126948
Chalk Talk clear stamp set - Item #130634

 Thank you for stopping by today. I hope you enjoyed today's blog. Click here to start your order or email me your order. Until next time keep stampin with Katherine.


Sunday, March 30, 2014

FM153 & FMS129 & RS108 blog challenges

Happy Sunday! I hope your enjoying your weekend. I hope to get outside and do some yard work today if they weather cooperates. I wanted to participate in a few challenges this week. So last night after making several cards, I finally came up a few results I liked. The two challenges you will see here are The Friday Mashup! & Freshly Made Sketches & Retro Sketches
I combined The Friday Mashup! & Retro Sketches.
I choose to use the mashup and combined the colors, Daffodil Delight, Perfect Plum and Wild Wasabi with the watercolor effect with the sketch of Retro sketches.

I had fun combing these two challenges as the possibilities are endless! My next challenge I decided to play in is Freshly Made Sketches.
This is what I came up in this challenge. I used the Chalk Talk framelits and Tag it stamp set.
I love participating in these challenges! I hope that you have an opportunity to play along. Love to hear your comments. Thanks for stopping by today. Until next time keep Stampin With Katherine.

Friday, March 28, 2014

Today's card class featuring Daydream Medallion & Floral Framelits

Happy Saturday! Thank you for stopping by my blog today. Today's card class, I wanted to show the ladies how to use one stamp set and get different results. It's so easy to see a stamp set and think of it in only one way of using it. Well not today, today we used the Daydream Medallion stamp set along with the coordinating Floral Framelits to get some pretty cool cards and projects. Last weekend I showed you the tissue paper flower using the Daydream Medallion. I did more in different variations...Roses come in all colors, wouldn't you agree?


The ladies made this beautiful tissue paper flower and we placed it on the purse.
Next we made a card using the 2012-2014 in color, Raspberry Ripple. My example show below is in Summer Starfruit. I showed the ladies how to use the Simply pressed clay and molds. It's a great medium and it changes things up from the standard buttons or brads.

Our last card is a great 3-D card. I wanted to make a sunflower using the Floral Framelits. So I started with More Mustard as my base. I added Early Espresso as the center and a touch of Always Artichoke for leaves.

I love this stamp set and coordinating floral framelits that I decided to play around with them and this is what I came up with. Love to hear your thoughts, please leave a comment.
 This card I added some sparkle to it, it's hard to see in the photo but in person it is beautiful!

 This next card I wanted to show you how to make a beautiful card and then how to spice it up. So the second card is the same except I pop it up with dimensionals and I added rhinestones.

I hope you have enjoyed today's blog and that you will share your fun daydream medallion cards with me! If you need to get any supplies mentioned here, click here to go to my store. Until next time keep Stampin With Katherine.

Stampin' Up! Easter egg fun

Happy Friday! I am working on some cards for my card class tomorrow, so I will be sure to post our creations but in the mean time, I was looking at the Stampin' Up! blog and wanted to share this post with you. So creative just in time for Easter. Hope you enjoy it! See ya tomorrow!

Easter Egg Decorating: Part 1

Easter is almost here. It’s time to have crazy fun decorating Easter eggs! Hurray! The method featured here is super-easy.

  1. Decide how many eggs you’ll need; drain the yolks.
  2. Using a Classic Stampin’ Pad (US/CA), stamp an image on a white napkin and cut it out using Paper Snips.
  3. Adhere the stamped image to the clean, dry egg by covering it with a coat of Mod Podge. Let dry.


In case you’re wondering, I used the cherry blossom stamp from the Morning Meadow Hostess Stamp Set. It can be yours for free if you host a qualifying Stampin’ Up! party—but any of our stamp sets with springtime images would work beautifully. The Classic Stampin’ Pad colors used here are: Calypso Coral, Coastal Cabana, Crisp Cantaloupe, Daffodil Delight, Strawberry Slush, and Tangerine Tango.
And that’s it! I’ll be posting some other ways to decorate Easter eggs in days to come. Stay tuned!
Do you have any fun ideas for decorating Easter eggs? We’d love to hear about them! Please share your ideas (or include a link to a photo) in the space below!
Cindy B.
Sr. Staff Writer
If you’d like all of the instructions on one page, here you go!

Tuesday, March 25, 2014

Weekly deals...

This week there is a variety of papers on sale. Good time to stock up. Click here to go to my site to start your order today. Thanks for stopping by today.

Weekly Deals

We hope you enjoy this week's Weekly Deals!


Silver Glimmer Paper Item # 124005
Regular Price: $4.95 US/$5.95 CAN
Discounted Price: $3.71 US/$4.46 CAN


Champagne Glimmer Paper Item # 127885
Regular Price: $4.95 US/$5.95 CAN
Discounted Price: $3.71 US/$4.46 CAN


This And That Epic Day Designer Series Paper Item # 130814
Regular Price: $10.95 US/$13.50 CAN
Discounted Price: $8.21 US/$10.13 CAN


Soho Subway Designer Series Paper Item # 130140
Regular Price: $10.95 US/$13.50 CAN
Discounted Price: $8.21 US/$10.13 CAN


Cajun Craze 8-1/2X11 Card Stock Item # 119684
Regular Price: $6.95 US/$8.50 CAN
Discounted Price: $5.21 US/$6.38 CAN


Brights Core'Dinations Cardstock Item # 129953
Regular Price: $23.95 US/$29.95 CAN
Discounted Price: $17.96 US/$22.46 CAN


Subtles Core'Dinations Item # 129954
Regular Price: $23.95 US/$29.95 CAN
Discounted Price: $17.96 US/$22.46 CAN


Wonderful You Board Book Template - Digital Download Item # 130103
Regular Price: $14.95 US/$16.50 CAN
Discounted Price: $8.97 US/$9.90 CAN

Sunday, March 23, 2014

Tissue paper flower using Floral framelits & Daydream Medallion

Happy Sunday! Yesterday my family and I enjoyed a beautiful day of sunshine, we cleaned the yard and played some baseball and celebrated my oldest son's 16th birthday. Today we are back to snow! Gotta love Montana. Since I am in the mood for spring I wanted to show you a flower I CASED from Connie Stewart. She has a great video on it. So I played around in a few different ways and want to share with you what I came up with.
First I start with a a standard piece of tissue paper.
Then you fold it in half hamburger style. I hope you know what I mean a lot of people have not heard that term before, in other words fold in half so that it is fat and not skinny.
Next you want to fold that in half again, same direction as last time.
Then you want to grab one end and bring it to the other end folding it in half.
Now you want to tri-fold this last part. So it is folded into thirds.


Now you will need the second to largest floral framelit and the big shot.
After you run this through the big shot you will have 24 individual pieces of tissue in the Floral Framelit style.
Now you can make a tissue flower using 12 or 24. So you could have 1 really full flower made up of 24 tissues or make 2 flowers each containing 12. But we have to stamp them first before we put them together.
Once you stamp each of them you will stack them all together, place them on the paper piercing mat and using the piercing tool, pierce the center. You will then put a small brad in the hole to keep them all together. The brad is never shown so don't worry about using a nice one. Then you fluff each tissue one at a time. Now I was so excited to put it together I forgot to take pictures for you along the way. So I did another one but smaller so I will show you that process. But here is the finished one with 12.

So here is the small one. I used the 2nd smallest Floral Framelit to create the small flower.
So you want to repeat the folding process with the tissue paper as I showed earlier. But when using the big shot you want to run it through using the 2nd smallest Floral framelit, you will get the same amount of tissues.

Then stamp each one using the Daydream Medallion stamp set.
Stack them all together and put them on the paper piercing mat.

Then you will use the brad to hold them all together.
 Now you want to fluff each piece of tissue to get the flower shape. When using the center you will squish (technical term) them tight and lighten up the squishing (more technical term) as you go to the last one.
You have all kinds of sizes of flowers you can make. So I decided to cut out a purse from the purse die cut and big shot.
I used the same Daydream Medallion stamp set and cherry cobbler to decorate the purse and then I put it together.
This purse is so cute. The purse needed something so I adhered my newly made rose to it with a glue dot.


This is how the small flower looks using 12 tissues, the large flower using all 24 and the large flower using 12.
Thank you for stopping by today. I hope you enjoyed today's tutorial and will leave me your comments. Until next time keep Stampin With Katherine. For all the supplies here check out my website.


Paper Pumpkin