Sorry for my absence on my blog, life seems to keep me busy. Hope all of you are well. We have so many changes coming up with Stampin Up! I hope excited. We are going to see a new catalog on June 1st. So make sure you check the retired list on my website to get those favorite stamp sets before they are gone. Today I want to show you a quick fun card and super cute for birthdays. Let's get started.....
I am using Pool Party Card stock and cutting it 4 1/4x 11.
Next you want to using your Simply Scored to score lines at 4 1/4 & 8 1/2
Crease the folds so the long end folds up first and then the top.
Now we are going to cut out a circle from the center top.
To embellish the center circle that will stand up you will need a 2 1/2, 2 3/8 & 2 1/4, as shown below. They lay on top of each other glued together with snail.
Now set that aside and we are going to run the top half of the card through the big shot using the polka dot embossing folder.
Now cut a piece of DSP(Designer Series Paper) to cover the bottom half. Measuring 4x4
Attach this to the bottom half of the Pool Party
Next we want to glue the circles we created earlier to the top part of the DSP.
Let's add a cup cake to the front to hold the flap down. I embossed a piece of Early Espresso to punch out the top part of the cupcake using the cupcake punch.
I stamped the bottom cupcake liner on Whisper white card stock using Pool Party.
I glued the cup cake to the front using a stampin Dimensional.
I cut a piece of Whisper White card stock for the side.
Here is the finished product and several different looks of the same card.
I hope to hear your comments and don't forget to sign up for my newsletter.
Stampin with Katherine
Check out today's tutorial using the April stamp set of the Best of 25 years stamps with Stampin! Up that I posted a few days ago. I just love butterflies, so why not do a card featuring them.
So let's get started.... Cut four 1 5/8 inch squares in Very Vanilla and four 1 7/8 inch squares in Wisteria Wonder.
Next you want to color the Very vanilla squares with Certainly Celery, Wisteria Wonder and Pink Pirouette.
I sponged the squares by rubbing the sponge back and forth on the Very Vanilla. It gives it a pastel look.
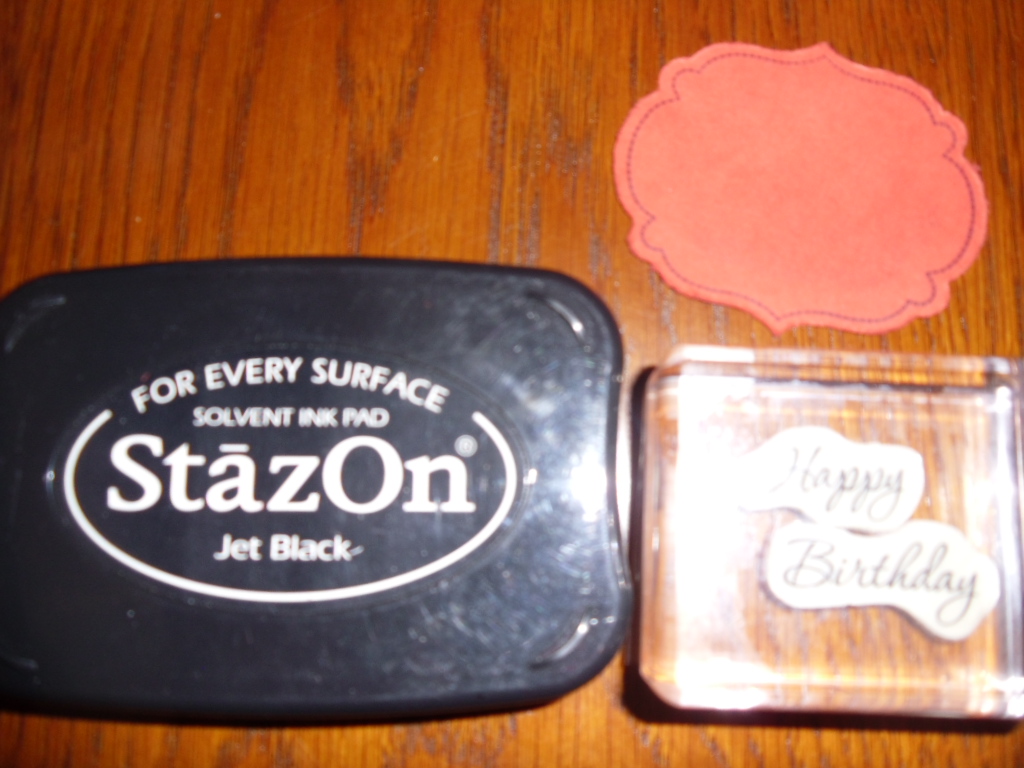
Now you can glue those to Wisteria Wonder squares and stamp the butterflies using black Stazon
I used Certainly Celery card stock and embossed it with flowers embossing folder.
I cut a set of glued squares in half on the diagonal and glue it all together using Snail adhesive on the card.
This is such a quick and easy card you can make in no time and it looks so springy!!!!! Check out my website for all your supplies and sign up for my newsletter here on my blog and get every post to your inbox!!!! katherinelepiane.stampinup.net
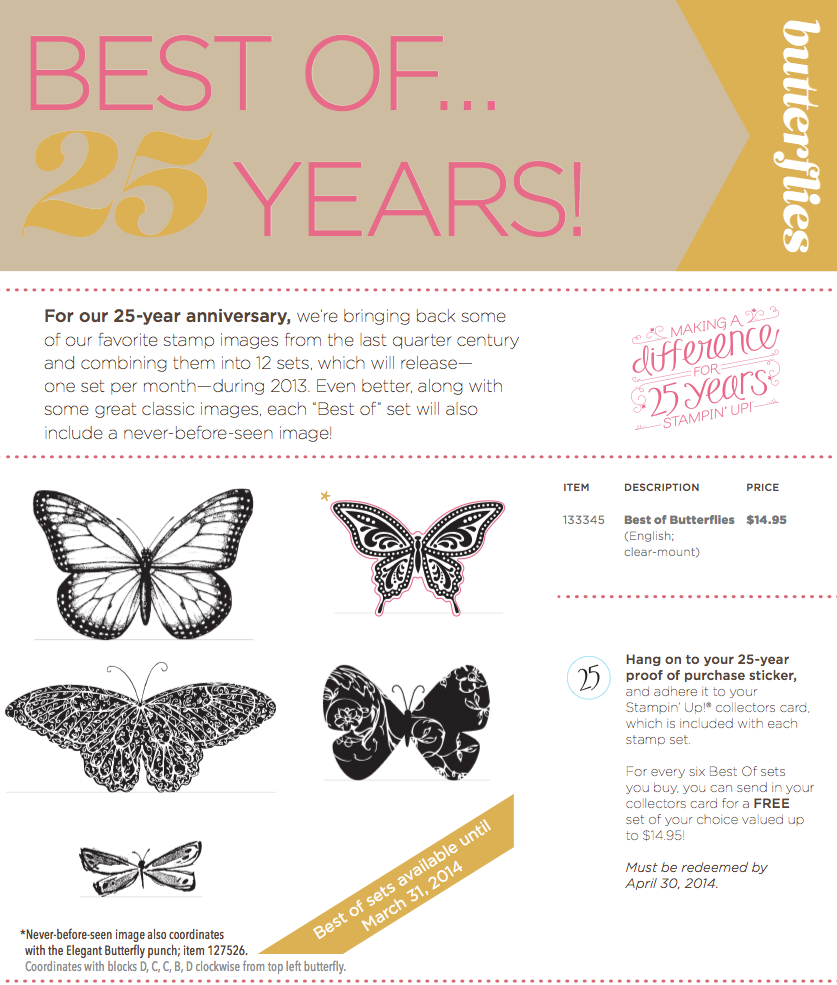
As part of our 25-year anniversary celebration, we're bringing back
some of our favorite stamp images from the last quarter century and
combining them into 12 sets, which will release-one set per month-during
2013. Even better, along with some great classic images, each "Best of"
set will also include a never-before-seen image!
Check back here every month to download a flyer for a new Best of
stamp set, and be sure to share it with your customers. Some things to remember:
All Best of stamp sets will include 3-5 images, including a never-before seen image, and will be priced at $14.95.
While we are releasing just one Best of stamp set per
month (with a new theme each month), all of the Best of sets will be
available until March 31, 2014.
A new flyer will be released every month for each new Best of set.
All Best of stamp sets are available in Clear-Mount only.
While we are
releasing just one Best of stamp set per month, all of the Best of sets
will be available until March 31, 2014.
As a special incentive to collect the Best of stamps, we're including a collector's card and 25-year proof of
purchase sticker with every Best of set. Collect six stickers, and send
it in to redeem a FREE set of your choice valued up to $14.95! Free sets
must be redeemed no later than April 30, 2014.
********************************
Yes you are reading correctly FREE SHIPPING for three days on any size order.
Tell
all your customers perfect time for them to purchase Best of Flower,
Best of Butterflies, This & That, the bundle special you name it.
And look at your sales totals! Do you need some sales to get out of pending, why not now with free shipping, that is a 10% discount on your sales. Do you need some supplies for upcoming events, why not purchase in the next three days and get a 10% discount?
Well it's another Tuesday and I hope it finds you all well! I want to teach you a technique called Herring Bone. You can create this look with your scraps and I love to use up scraps!!!!! I cut the strips about 1/8 to a 1/4 inch thick. So lets get started. I went with a masculine look on this card.
Stampin supplies:
Early espresso card stock 8 1/2x11 - item # 119686
Cajun craze card stock 8 1/2 x 11 - item # 119684
Whisper White card stock 8 1/2 x 11 - item # 100730
Multipurpose adhesive sheets - item #120805
scrap pieces of DSP
Snail adhesive - item # 104332
labels collection framelits - item # 125598
Paper Piercing mat - item # 126199
Paper piercing tool - item # 126189
1/8" mini brads - item # 122941
Stampin Dimensionals - item #104430
To start you want to cut a piece of multipurpose adhesive sheet 4 x 5 1/4 and a piece of whisper white card stock 3 3/4 x 5. You want to take one side of the multipurpose adhesive sheet off and lay the whisper white card stock on top of that. Now you want to pull the other side of the multipurpose adhesive sheet off so you have a sticky side.
Take your strips of paper and make two triangles on the sticky strip and then two triangles off the main two. Now you want to use the dsp paper in any order you would like and you want to use the legs off the main line. Follow the direction of that leg.
It give a great look as you can see! Now you can adhere this to the early espresso card stock as your base. Now to add the finishing touches.... I stamped the label on Cajun Craze card stock and using the big shot and the label framelit collection.
I used Stazon on Jet black ink to stamp Happy Birthday.
I wanted to give the label a distressed look, so I used the distressing tool on the edges to give it a worn leather look.
I used the paper piercing mat, tool and mini brads to pierce the label. Adhere this to your card using stampin dimensionals.
There you have it- a wonderful herringbone technique masculine card! I have posted below this card a sample of another look using a herringbone technique.
I hope you give this technique a try. If you have any questions please post a comment and I am happy to help you. Please stop by my website for all you Stampin Supplies. Happy stamping! http://katherinelepiane.stampinup.net


")


