Tuesday, February 26, 2013

Tutorial Tuesday - Stampin Up Tutorial #2

I would like to share a tutorial with you on Tuesdays! Today we are going to learn how emboss waxed paper and make a card from it. It is so cool, it's almost magical! Let's get started.
Supply List:
Wax paper
Iron set to cotton w/ no steam
Glossy paper - item # 102599
Whisper White 3/8" Taffeta Ribbon - item # 109070
Whisper White Cardstock - item #100730
Perfect Plum Cardstock - item #101889
Melon Mambo cardstock - item #115320
Elegant Eggplant Classic Stampin Pad - item # 126969
Rhinestone Basic Jewels - item # 119246
Snail Adhesive - item # 104332
Stampin Dimensionals - item #104430
Brayer - item #102395
Vintage Wallpaper Folder - item # 120175
Fun Flowers Bigz L - item #121812
Big Shot - item #113439


To get started you need to cut a piece of Whisper White cardstock to 5 1/2 x 8 and fold in half to be your card base. Next take a piece of wax paper 4 1/2x 5 3/4 and emboss it with your vintage embossing folder.
For the card front take a piece of Glossy Cardstock 4"x5 1/4", shinny side up, and place the embossed wax paper on top.
Cover the glossy paper with typing paper to protect your iron from wax, I also put a piece of typing paper under it so not to mark up the table.
With your iron on setting on "cotton" no steam iron the paper. Iron for about 1 to 2 minutes. You will be able to see the wax start to imprint the typing paper.

Remove the wax paper, you can throw the wax paper away as it is one time use only. The glossy paper will seem like nothing has been done but that is where the magic comes in to play.
Then apply ink to the glossy paper with a brayer or sponge in a circular motion until you have the desired look you want.  I have used Elegant Eggplant.
Isn't that amazing!!!!! Instant design!
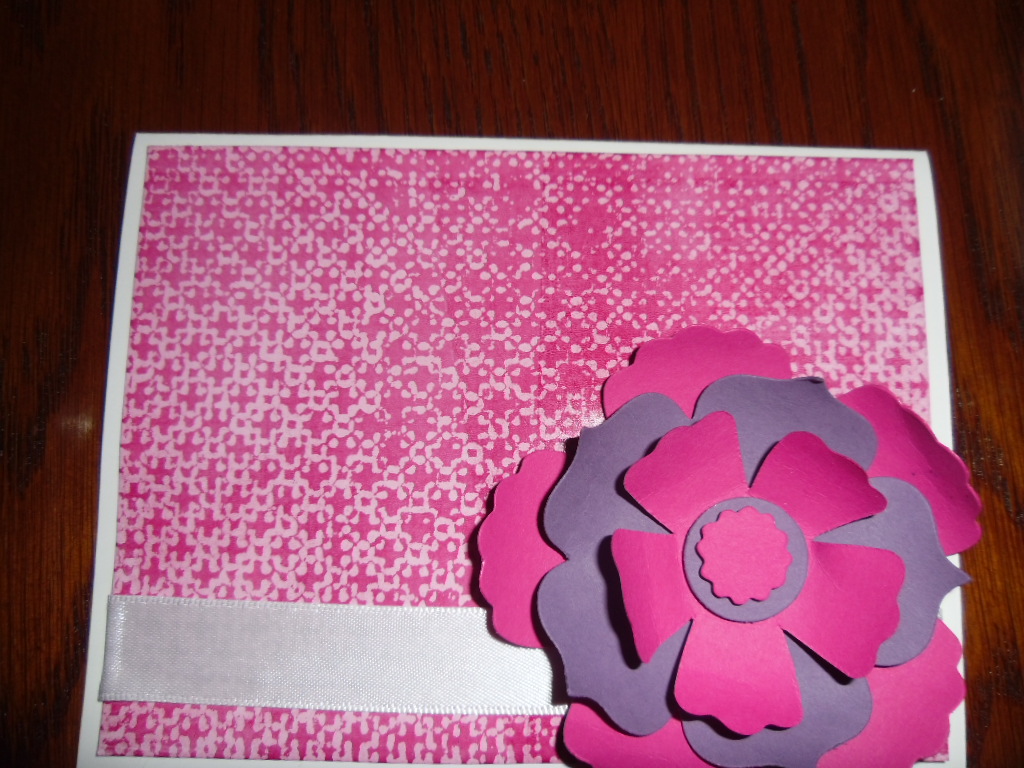
To pull the rest of the card together I used the Fun Flowers Bigz L with the big shot to cut out  flowers from both Perfect Plum cardstock and Melon Mambo.
 
I used dimensionals to put the flower together. I used a rhinestone to top it all off. To curl the petals of each flower, I used a pencil to curl the edges.

To finish the card off with adhering the Whisper White ribbon with Snail adhesive to the front.
Last but not least, adhere the flower to the front of the card with double stick tape and Viola!!!!!! You have a wonderful card.
Here is another version of this card......
Have fun with this Embossed Wax paper Tutorial!!! Until next time... Happy Stamping
Stampin with Katherine


Monday, February 25, 2013

Stylin Sunday continued.....

I had so much fun with yesterdays tutorial I thought I would share a few other designs I came up with! Enjoy!!

Thanks for stampin with Katherine

Sunday, February 24, 2013

Stylin Sunday - Stampin Up Tutorial #1

Hello Everyone-

So for my first card blog, I have decided to showcase the new Dress Up Framelits from Stampin Up! It is so cute, you are going to love it! So let's get started......

Supply list:
Crumb Cake card stock - item # 120953
So Saffron card stock - item # 105118
Whisper white Card stock - item # 100730
Soft Suede card stock - item # 115318
DSP Floral District - item # 126919
Paper piercing tool - item # 126189
Stampin Pierce Mat - item # 126199
Stampin Dimensionals - item # 104430
Snail Adhesive - item # 104332
Pearl Basic Jewels - item # 119247
Framelits labels Collection - item # 125596
Dress Up Framelits - item #130101
Festive Paper-Piercing Pack - item #127857

To start things off, cut a piece of crumb cake card stock 5 1/2x8 1/2 and fold in half to get your card base. Then using the the Framelits Labels collection cut out the 2nd largest label in So Saffron using the big shot on the 2nd tab as shown below.

Now we want to cut out the 4th smallest label in Whisper White card stock using the big shot. Using the same tabs as I did with the So Saffron.
Next use the the Dress up framelits and cut out the dress stand using Soft Suede card stock and the sleeved dress out of DSP Floral District.
Now we want to add some dimension to the So Saffron card stock, so we are going to use our paper piercing tool, paper piercing mat and the Festive Paper-Piercing pack. We are using the label template over the label we cut out and pierce all the way around as shown here-
Now we want to tape the So Saffron to the crumb cake using adhesive and center it on the card.
Now to adhere the Whisper White card stock we will use Stampin Dimensionals. I used four, one on each side before adhering it to the So Saffron label.
OK let's work on the dress! We want to adhere the dress to the dress stand. Use snail adhesive to glue the dress to the dress stand.
Now to adhere the Dress stand to the card, I used two dimensionals on the back before placing it on the card. I aligned the feet of the stand with the bottom of the card. This gives the card more dimension.
Now to add the finishing touches! I added a pearl necklace to add the finishing touches and I think it pulls it all together!
I hope you have enjoyed today's Stylin Sunday Tutorial. Please tune in for my next tutorial or sign up to join my email notifications and get this tutorial right to your inbox. Until next time....Happy Stamping!!!!

Stampin with Katherine


Friday, February 22, 2013

Another Card blog


There are so many card blogs out there, I thought I might as well be one of them! Hi! I am a Stampin' Up Demonstrator in Lolo, Montana. I have decided to make a big leap and start my own blog. I hope to provide you with some beautiful cards along with how to's of that card. Hope you will stay tuned  and add yourself to my mailing list for Stampin Up!

Paper Pumpkin